Kia Niro: Cylinder Block / Cylinder Block Repair procedures
| Disassembly |
|
|
Mark all wiring and hoses to avoid misconnection. |
| 1. |
Shut off the high voltage circuit. (Refer to Engine Mechanical System - “High Voltage Shut off Procedure”) |
| 2. |
Remove the engine assembly from the vehicle. (Refer to Engine and Transaxle Assembly - “Engine and Transaxle Assembly”) |
| 3. |
Remove the dual clutch transmission. (Refer to Dual Clutch Transmission (DCT) - "Dual Clutch Transmission Assembly") |
| 4. |
Install the engine to engine stand for disassembly. |
| 5. |
Remove the intake manifold. (Refer to Intake and Exhaust System - "Intake Manifold") |
| 6. |
Remove the exhaust manifold. (Refer to Intake and Exhaust System - "Exhaust Manifold") |
| 7. |
Remove the hybrid starter generator (HSG). (Refer to Hybrid Motor System - "Hybrid Starter Generator (HSG)") |
| 8. |
Remove the timing chain. (Refer to Timing System - “Timing Chain”) |
| 9. |
Remove the Cylinder head assembly. (Refer to Cylinder Head Assembly - "Cylinder Head") |
| 10. |
Remove the fly wheel. (Refer to Cylinder Block - "Fly Wheel") |
| 11. |
Remove the thermostat. (Refer to Cooling System - "Thermostat") |
| 12. |
Remove the water pump assembly. (Refer to Cooling System - "Water Pump") |
| 13. |
Remove the A/C compressor. (Refer to Heating, Ventilation Air conditioning -"Compressor") |
| 14. |
Remove the oil filter. (Refer to Lubrication System - "Engine Oil") |
| 15. |
Remove the oil screen. (Refer to Lubrication System - "Oil Pan") |
| 16. |
Remove the piston and connecting rod assemblies. (Refer to Cylinder Block -"Piston and Connecting") |
| 17. |
Remove the Crankshaft. (Refer to Cylinder Block -"Crankshaft") |
| 18. |
Remove the knock sensor. (Refer to Engine Control / Fuel System - "Knock Sensor") |
| 19. |
Remove the crankshaft position sensor (CKPS). (Refer to Engine Control / Fuel System - "Crankshaft Position Sensor (CKPS)") |
| 20. |
Remove the oil pressure switch. (Refer to Lubrication System - "Oil Pressure Switch") |
| 21. |
Remove the water jacket insert. (Refer to Cylinder Block - "Water Jacket Insert") |
| 22. |
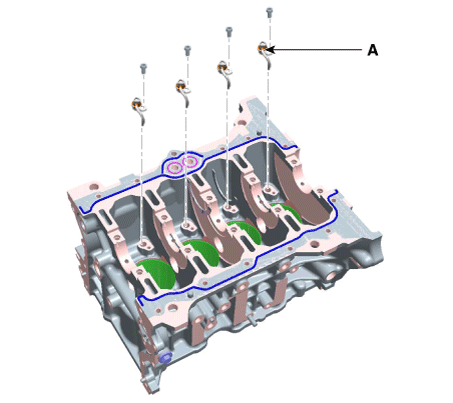
Remove the piston cooling oil jet (A).
|
| Inspection |
| 1. |
Remove gasket material. Using a gasket scraper, remove all the gasket material from the top surface of the cylinder block. |
| 2. |
Clean cylinder block Using a soft brush and solvent, thoroughly clean the cylinder block. |
| 3. |
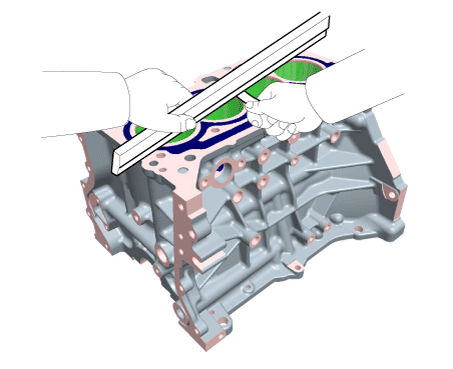
Inspect top surface of cylinder block for flatness. Using a precision straight edge and feeler gauge, measure the surface contacting the cylinder head gasket for warpage.
|
| 4. |
Inspect the cylinder bore Visually check the cylinder for vertical scratches. If deep scratches are present, replace the cylinder block. |
| 5. |
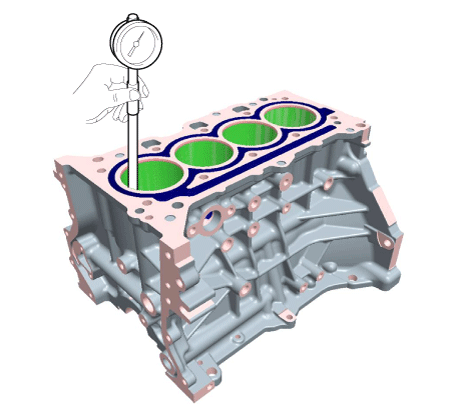
Inspect the cylinder bore diameter. Using a cylinder bore gauge, measure the cylinder bore diameter at position in the thrust and axial direction.
|
| 6. |
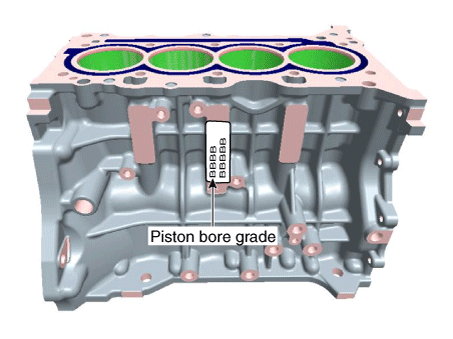
Check the cylinder bore size code on the cylinder block side surface.
Cylinder Bore Inner Diameter
|
| Reassembly |
| 1. |
Install the piston cooling oil jet (A).
|
| 2. |
Assemble the remaining parts in the reverse order of disassembly.
|
 Crankshaft Repair procedures
Disassembly
•
Be sure to read and follow the “General Safety Information and
Caution ...
Other information:
Kia Niro 2017 (DE HEV) Service Manual: Battery Sensor Description and operation
Description
Vehicles have many control units that use more electricity. These units control
their own system based on information from diverse sensors. It is important to have
a stable power supply as there diverse sensors giving a variety of information.
Battery sensor (A) is mou ...
Kia Niro 2017 (DE HEV) Service Manual: Rear Pillar Trim Components and components location
Component Location
1. Rear pillar trim
...


