Kia Niro: Dual Clutch Transmission Control System / Gear Actuator Assembly Repair procedures
| Removal |
|

| 1. |
Shut off the high voltage circuit. (Refer to Automatic Transaxle System - "High Voltage Shut-off Procedure") |
| 2. |
Drain the coolant of hybrid cooling system. (Refer to Hybrid Motor System - "Coolant") |
| 3. |
Remove the hybrid power control unit (HPCU) assembly. (Refer to Hybrid Control System - "Hybrid Power Control Unit") |
| 4. |
Disconnect the TCM connector (A) and ECM connector (B).
|
| 5. |
Remove the TCM (A) and ECM (B).
|

| 6. |
Remove the HPCU tray (C) after removing the nut (A) and wiring mounting clips (B).
|

| 7. |
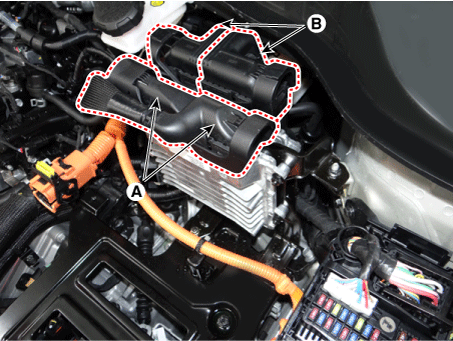
Disconnect the gear actuator motor connector (A) and gear actuator solenoid connector (B).
|

| 8. |
Remove the gear actuator assembly after loosening bolts (A, B).
|

| Installation |
| 1. |
Install in the reverse order of removal. |
|


 Gear Actuator Assembly Schematic diagrams
Schematic Diagrams
...
 Input Speed Sensor Components and components location
Component Location
1. Input speed sensor
...
Other information:
Kia Niro 2017 (DE HEV) Service Manual: Front Door Belt Inside Weatherstrip Repair procedures
Replacement
1.
Remove the front door trim.
(Refer to Front Door - "Front Door Trim")
2.
Remove the front door belt inside weatherstrip (A).
3.
Install in the reverse order of removal.
...
Kia Niro 2017 (DE HEV) Service Manual: Crash Pad Garnish [RH] Repair procedures
Replacement
Put on gloves to protect your hands.
•
Use a plastic panel removal tool to remove interior trim pie ...
